Showing posts with label christmas. Show all posts

Saturday, January 2, 2016

We Love Gingerbread Houses


Linus's creation
had an amazing
set of storylines
I think I never did post last year's gingerbread.  And, now that I think about it -- the year before.  Darn.  We love our annual gingerbread-making for the Waldorf Winter Faire, but it's such a busy time of the year, it's hard to get to that last step.  I'll start with 2015 (and see how many other years I can dig up). 

This year both kids went with kits.  Sometimes they do, sometimes they don't.  It all depends on what's driving their vision at the time. 2015 was about buckets of candy.

This is one of our very favorite family traditions.  We keep threatening to do it during the year, too.  The possibilities really open up when one leaves December and snow...


Sela's bears warm their
paws at the fire
after a nice skate

I like to try something new every year.
Gingerbread in an igloo pan (I KNEW
I needed it).  I made it the day before the auction and titled it "Tonight's Dessert."
I really hope they cut into it that night and enjoyed it!

The trees are ice cream cones with icing, the wreath is a spearmint gumdrop cut into small pieces, the light strings are licorice wheels from World Market.  I have no idea what those little colored balls are called -- they are personally delivered by my Gingerbread Organizer Extraordinaire friend every year.  A light dusting of powdered sugar -- I mean, snow -- finishes it off.


I tried the "grease & sugar" method for this cake -- turned out great!

Thursday, January 1, 2015

File It Under: Where to Find This Next Winter

It's a good, good life.  It's a wonderful life.  It's also become a life where I'm generally two steps behind!  Ah well.  I can work with that, I suppose.  (I'm loaded with tricks.)

Our local art museum features a monthly Crafternoon for families.  It's exceedingly well done -- three craft projects that are interesting to do AND to have around the house afterwards, as well as being manageable for little ones and also engaging for adults.  It's very inexpensive, and, honestly, gathering the supplies for and executing three projects at home would cost more on my own (and I really love crafting with my kids!).  December's projects were beaded snowflakes, felt wreaths, and paper ornaments.  I had just a minute to learn to make the ornament, but I was so captivated by it that I made myself a tutorial for next year!

 Fold an origami square in half diagonally.

 Fold it in half again, forming a triangle.

 Hold the triangle so that the bottom edge could open.

 With the triangle closed flat,
make at least three cuts.
DO NOT cut all the way across.
Try to leave the same margin at edge for each cut.

 When you open your paper, 
it should look like this.

 Using double-stick tape,
roll in the innermost two flaps.
Because it's tiny, I use a pencil or the scissor tips
to help me make them stick together.

 Now, TURN IT OVER.
Repeat with the second set of flaps.

 TURN IT OVER AGAIN.
Repeat.

 Turn it over again. 
Repeat until all flaps are matched with corresponding flaps.

 Punch a hole & string it.
Beautiful for hanging in arrangements in windows.
Sela experimented with making more cuts.

 I experimented with making a star.
I cut two pieces of origami paper into 4 squares each.
(You need only 6 of the squares.)
I made 6 ornaments, 
and using double-stick tape at the bottom tips
put together two sets of 3.

With more double-stick tape,
I combined the two sets.

This one is small enough to hang 
with the Christmas cards or from the mantle.
Sela made one with regular origami paper
that is large and looks beautiful hanging in the window.
They have an wondrous way of feeling as though
they bring in light.
So lovely in these winter months!

(Happy Winter, You, and Merry Christmas 2015, Me!)

Monday, December 29, 2014

Crafting Together

This year we made rolled beeswax candles to give as gifts, and it might just be the most fun-to-make gift we've ever done.  It's not original.  It's not elaborate.  But, (and I hope our loved ones think so, too) I think they are a classic beauty.  The icing on the cake was how lovely and truly relaxing it was to make them together.  I'll go back to this project again and again.  (And also, back to the bee keeping supply store where we bought the sheets of beeswax.  We have our eye on supplies to make lip balms next time.  And molded candles after that.  And then we'll see what else strikes our fancy!)

Linus will demonstrate the process, in the spirit of a remarkably family-friendly project.

 We opted for two tapers per sheet, 
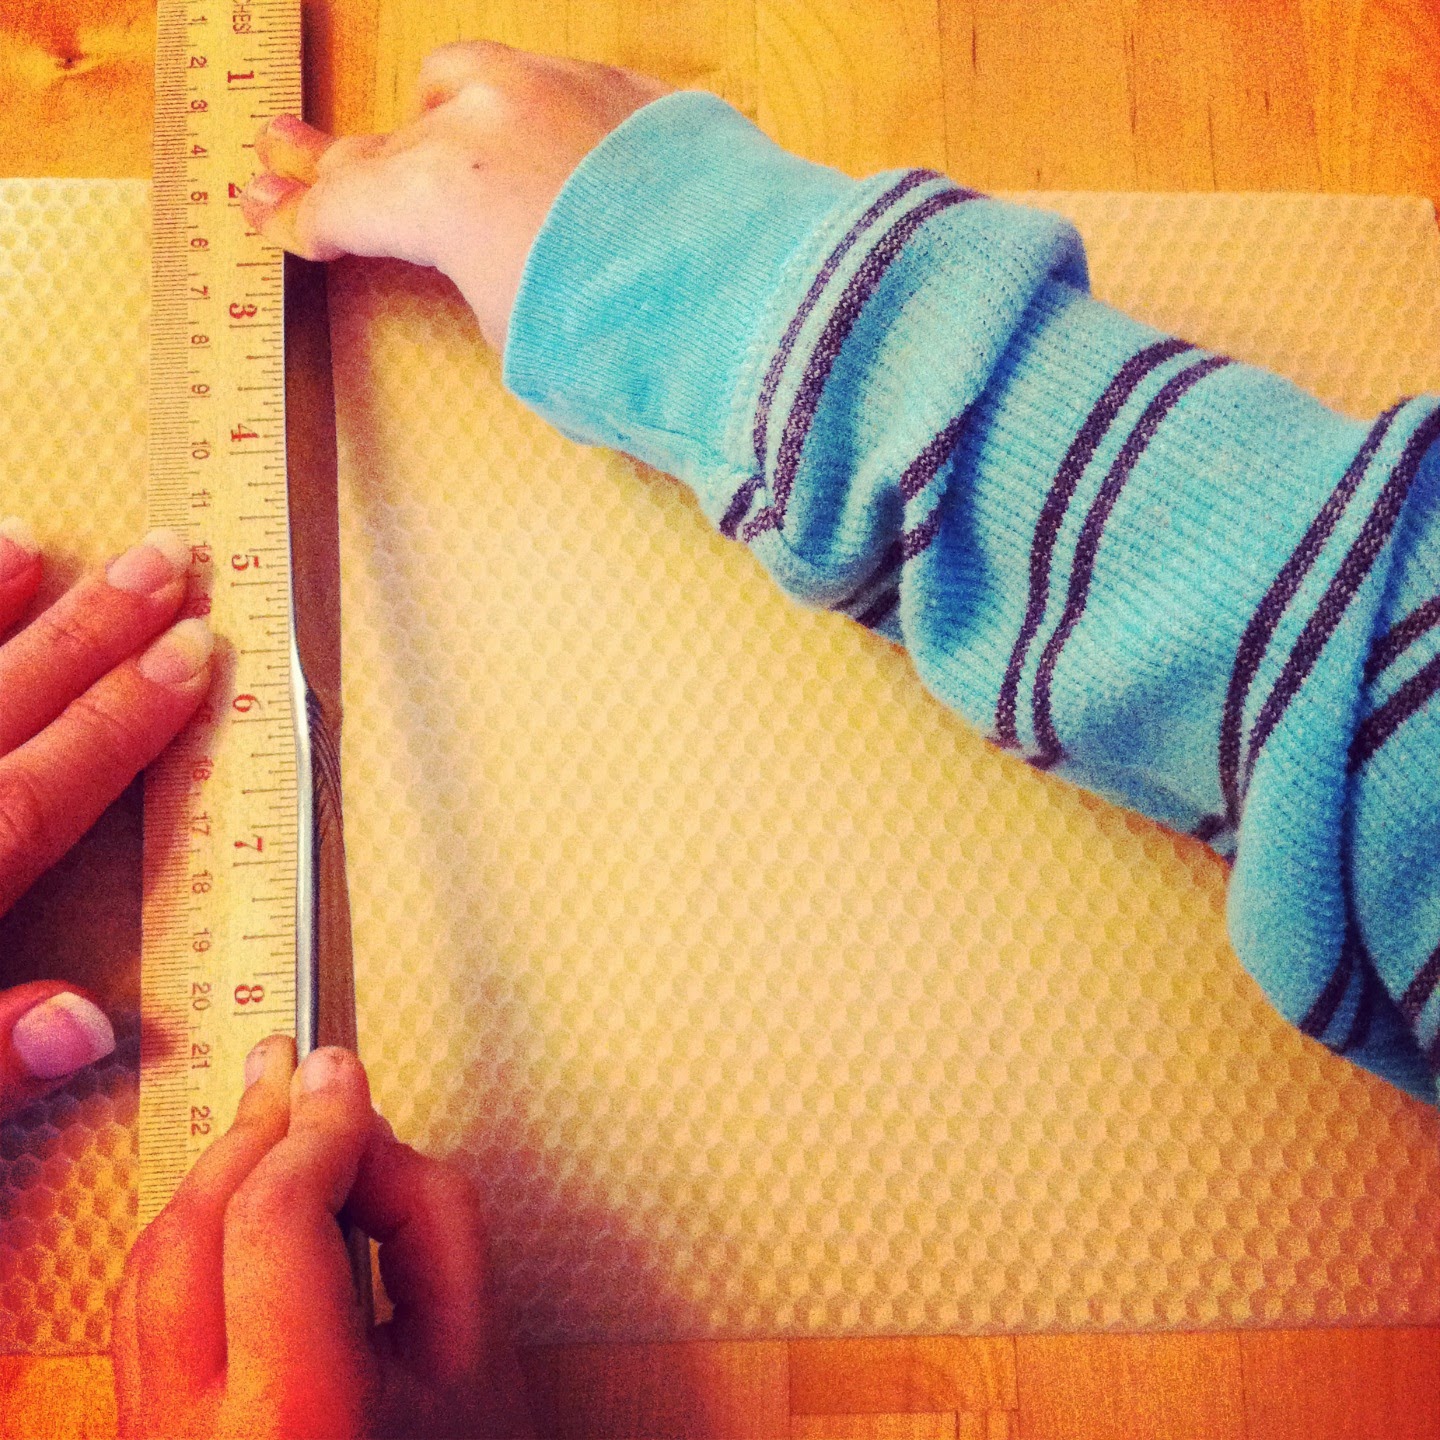
so we measured it and found the halfway point,
scoring with a butter knife at the top and bottom edges.


 Using our marks at the top and bottom,
we used a straight edge to score a complete line.
No need to saw, just press it into the wax.
Then, pick up the wax sheet and bend it.
It will break into two pieces.


 Lay the wick along the edge and trim to size.


 Press the wick along the edge to keep it in place.
Curl up the edge so that it covers the wick.
Then, roll, roll, roll.


 Press the seam from top to bottom to seal it.


I just love them!  Thanks, Linus <3

Wednesday, December 25, 2013

Celebrate


The Big Dance

To all the mamas & daddies who planned, 
shopped, wrapped, shuffled, baked, made, 
cooked, assisted, fretted, cleaned, and gave up sleep
to put together a special holiday for your family --
you did it!

Wishing you a joyful day & a harmonious 2014!

Friday, December 13, 2013

Make & Listen Along with Simple Thing Notebook

I've been wanting to join Dawn for Make & Listen Along at Simple Things Notebook for ages.  Yesterday I finally made it happen!  (Christmas miracles, I tell you.  Christmas miracles.)

Three cheers for Dawn, for Christmas, for gingerbread, for creativity, for a cozy house on a cold day, for candles, and for Harry Connick, Jr.'s What A Night!

It's the Little Things...


We made cookies that called for crushed candy canes, and the kids decided how many they thought should be used.  Worked out great for me because the extras are used to sweeten my coffee.  And, they're pretty sweet-looking on my kitchen counter, too!

Next year, this will be done as a matter of course.  "Kitchen helpers!  I have a job for you!  Bring your hammers!"

Sunday, December 1, 2013

Sometimes you need a little something...


Looking for a simple, cute & functional craft activity?
How about these wreath napkin rings?  They make cute package toppers and tree decorations, too.
Sometimes we need something for a mixed group -- kids who love crafts, kids who don't always but are in for something simple, big kids, little kids, adults.  Easy to make a few or a bunch.  Great for a gathering.

Here's what you need:
pipe cleaners
green tri beads
red round beads
ribbon
scissors

Cut pipe cleaner to size, slide beads on, twist ends to form a circle, tie on bow!


Monday, January 14, 2013

Stained Glass Cookies

These cookies looked difficult -- but they really weren't!
Make them during a play date for more fun 
(& something for kids to do between steps)

1 cup colored hard candies (Jolly Ranchers or Life Savers)
Nonstick cooking spray
1 stick of butter, softened
1/2 cup sugar
1/2 tsp vanilla
1 egg
1 1/2 cups flour
star cookies cutters in 2 sizes

1- Put candies into sealable plastic bags, cover with a towel & break them into small bits with a hammer.  Set aside.
2- Cover a baking sheet with foil & spray it with nonstick cooking spray.  Set aside.
3- Preheat oven to 350 degrees.
4- Combine butter, sugar, vanilla.  Beat egg and add.  Beat in flour.
5- Sprinkle flour on your work surface & roll dough to 1/4-inch thickness.
6- Cut out cookies using larger star cookie cutter & transfer to prepared cookie sheet.
7- Cut out smaller stars from the cookies on the pan.
8- Bake the cookies for 5 minutes, remove them from the oven & put candy bits into the centers.
Bake for another 5 minutes.
9- Let the cookies stand until completely cool, about 30 minutes.


from American Girl magazine, November/December 2007

Sunday, January 13, 2013

Let it snow, let it snow, let it snow!


Christmas is over, but it's still winter!
And, there are still some Christmas baubles in stores, at greatly reduced prices -- will you be out and about this weekend to pick up a couple?
Or, you probably have something just-perfect around your house.

How to Make a Swirling Snowstorm
1.  Find a (used) jar with lid and cute-something that fits nicely inside.
2.  Test the jar and lid to make sure they are water-tight.
3.  Glue your cute-something to the inside of the lid with a water resistant glue & let it dry. (Our "tool drawer" had a variety of good options.)
4.  Fill 1/3 of the jar with glycerine (available at Rite Aid, CVS, any pharmacy).
5.  Add some glitter -- you don't need a whole lot (we discovered this the hard way...).  Stir.
6.  Fill with water.  You want to have as little air as possible in your snowglobe, so experiment with putting the lid/figure on and off as you add water.
7.  Put glue on the inside edge of your lid and screw it onto the jar.
7.  Add a decorative ribbon or edging to the lid.

made with the help of Dawn and Jane Bull

Sunday, December 30, 2012

Cookie Building


The Christmas season just wouldn't be quite the same without our gingerbread creations. 
 
We tried some new things this year, and as you can see, we needed to be sure we had a nice, sturdy icing for it...
 
I found a fantastic recipe on about.com --
Beat together on high for 7-10 minutes: 1 lb. confectioner's sugar, 3 egg whites & 1/2 tsp. cream of tartar.
 
We use sealable plastic bags with a tiny bit of the corner snipped off as pastry bags.
Can you spot Santa Bear on the roof?
Teddy Bears sledding?
Bears caroling around the Christmas tree?
 
Away in a Gingerbread


To get all these cookies to stand up, I made paper templates for stands.  Using the cookie cutter height as my guide, I cut triangles and labeled them.  Some templates could be used for multiple cookies.  People got one stand each, animals got two.

I got better & better at it as I went along.  This was the winning combination -- so fast & easy once I figured it out!
 
Hold your cookie in the correct spot & pipe a line of icing where the base of the stands will go.   

Remove the cookie and pipe icing where stands will touch the back of the cookie, as well as on the bottom of the cookie, where it will touch your plate.

Place your cookie in front of the piped lines on your plate.
Place a plain, uniced stand on the plate & against the cookie.

Repeat with the second stand.
 
Voila!
This icing recipe made it very sturdy once it dried.
It's definitely the one we'll use next year.
(And, now I'll know where to find it, too.  My gift from me, to me.)
Happy creating!

Friday, December 28, 2012

Finding Inspiration

What inspires writing at your house?
Chanukah, Winter Solstice and Christmas gave Sela cause to pick up her pen(cil).

As we all begin to pack away our decorations for another year, I send you wishes for celebration and inspiration in 2013.


Happy Chanukah
Happy Chanukah,
Happy Chanukah,
While candles bright are burning
Happy Chanukah to you!

Candles
Candles, candles, burning bright,
How lovely you look on a dark winter's night.
Candles, candles, show your light,
Oh, what a beautiful, beautiful sight.


Snowy Acrostic
Soft and cold
       Not bad, but great
              Out of nowhere it falls
           White and wonderful
 Yay for snow!


Christmas Carols (haiku)
Short, long, high or low
Christmas carols are great fun
To sing along to

Stockings
Hanging by the fireplace,
On Christmas to them there's a race,
Filled to the top with games and toys,
All of these are Christmas joys!

Mistletoe
Mistletoe, mistletoe, over the door
Walk under again and
I'll kiss you some more!

Christmas Haiku
Christmas is a time
Of happiness, love & joy
The world celebrates!


Tuesday, December 25, 2012

Christmas Cookies

Christmas Cookies (a haiku)
by Sela
 
 
Alone or with friends
Baking delicious cookies
Is always super


pecan logs
1 cup butter, softened
5 Tbsp confectioners' sugar
2 tsp vanilla extract
2 cups flour
1 cup finely chopped pecans
confectioners' sugar

Cream together butter and sugar until light and fluffy.  Beat in vanilla.  Add flour, beating on low speed just until combined.  Stir in pecans.  Cover & chill for 30 minutes.
Shape 1/2 cupfuls into 1/2-inch thick logs.  Cut logs into 2-inch pieces.  Place 2 inches apart on baking sheets.  Bake at 350 for 15-18 minutes.  Roll warm cookies in confectioners' sugar.

tip
A simple way to chop nuts it to put them in a bag and roll them with a rolling pin!

from Taste of Home Holiday: Christmas Cookies & Candies


Monday, December 24, 2012

Mother's Work

I always love some quiet time at the end of the day,
when everyone is asleep but me.
I can't help but hear the famous line,
"not a creature was stirring, not even a mouse."
I love this all year round.
When everything is still, I can REALLY take in the beauty of our day,
our home, my children, in a way that's a little less, well, a little less like herding cats.
 
Recently, we read Peter Pan.  I connected with it in a way I hadn't expected.  Early on, Barrie writes this:
Mrs. Darling first heard of Peter when she was tidying up her children's minds.  It is the nightly custom of every good mother after children are asleep to rummage in their minds and put things straight for the next morning, repacking into their proper places the many articles that have wandered during the day.  If you could keep awake (but of course you can't) you would see your own mother doing this, and you would find it very interesting to watch her.  It is quite like tidying up drawers.  You would see her on her knees, I expect, lingering humourously over some of your contents, wondering where on earth you had picked this thing up, making discoveries sweet and not so sweet, pressing this to her cheek as if it were as nice as a kitten, and hurriedly stowing that out of sight.  When you wake in the morning, the naughtiness and evil passions with which you went to bed have been folded up small and placed at the bottom of your mind; and on the top, beautifully aired, are spread out your prettier thoughts, ready for you to put on.

In December, these maps of the minds Barrie describes, these Neverlands, spill over into little vignettes around the house. 
And a sleeping house reveals things like this --
tucked beneath our big tree, a tiny little tree with tiny little
presents wrapped with care for softies and dolls.
I can feel her sweet heart, lying right there on top.


A Griswald's Christmas Tree


I learned something new this Christmas.  I didn't really want to learn it at the particular moment I learned it, but...
We went to the mountains and chose our tree.  We cut our tree, strapped it to the top of the car, stopped for a warm, cozy dinner on the way home.  Lovely.  (Did I mention there was a tree farm pie shop involved?)
Tree goes in the stand, DH goes out to buy new lights (another story altogether, but that's for another day), I put the lights on the tree.  I run out of lights.  I send DH out for more lights.  At this point, I'm in it too deep to turn back, but wonder if I should really have 1400 lights on the tree.  Well, I've made my bed and now I'm going to have to lie in it.  We do love how the tree looks after it's finished.
We drag out the ornament box, kids are giddy to get their hands on the ornaments and start decorating(fairly spazzy, to be completely honest). Sela plugs in the cord... GASP!  OOOO!  AAAAAH!  And then... total darkness.  Silence.
I want to dissolve into a puddle.  Or run from the room.  But, my sweet little ones have been waiting, waiting.  I have no choice but to solve the mystery of why the lights went out and fix it.
Did you catch the clue?  I said Sela plugged in "THE" cord.  Now I'm remembering something about "you're not supposed to connect too many light strands together."  Hmmm.  So, probably 8 is too many?  I'm remembering "fuses." Something about changing blown fuses.  Good thing I have always compulsively saved all those tiny fuses even though I never had any intention of dealing with them.
Turns out, it's so easy.  So, a gift from me to you this season: How to Change a Fuse, or How to Avoid the Griswalds' Christmas at Your House.
I went to the source of all current know-how and found a YouTube clip on the subject.
How to get the tiny fuse box open?! It slides DOWN.
Pop out the fuse with your tiny screwdriver.
Press the new fuse in with the flat side of your tiny screwdriver.
So, save your fuses and bulbs, people. Get yourself a cute little box & locate your tiny screwdriver. Keep them handy, and you'll be set for the light mishaps.  (Oh, and maybe pick up a few extension cords.)